Pages

Thursday, August 27, 2020

Bonsai Island with a small leaf Ligustrum quihoui: Ishizuki

I worked today with a rock planting small leaf Ligustrum quihoui today, finally resetting it back on the stone after it slipped off last year.


I started this project in 2007 as part of an Austin Bonsai Society workshop with artist Terry Ward. We each brought in our own stones and worked on setting a screen cage to hold the roots of a plant.


For plantings like this, you don't want to fill up interesting cavities and formations with the roots, but instead try to cover over an uninteresting part of the stone. Here it is clinging to the backside of the stone. We used window screen with a thin wire woven into it to strengthen the edges and a two-part epoxy putty meant to be used for water projects to bond it to the stone. It created a nice stable pocket.


After assembling it, this stone was set aside for a plant. Four years later I just wanted to put something into it, so started looking for a suitable plant. I wanted something with small leaves and which can take some extreme conditions of living on a stone.


Cleaning up some plants, I found some small collected Ligustrum quihoui I had dug a few years earlier. repotting them in 2011, I found this one with a curved leaning trunk which looked like it would grow on my stone.


It was trimmed back and planted in a small pot briefly first


Then transferred to the hidden pocket on the stone. I had imagined that it would be a windswept image with the trunk snaking over the rock.


It lived on the stone for a several years, but the glue had become loose in several spots, so was not worked on for a while and last year it completely dropped off from the stone. Thinking about it now.. I should have roughed the stone where the glue was to bond.  I don't think I gave it enough "tooth" to stick well in the long run. It has been separated like this for this year and today I couldn't stand it any longer. I had read about an older Japanese technique to anchor loops to the stone and decided to give it a try.


Started off by drilling small holes using a carbide drill. These went down about 1 cm. Drilling into the limestone was fairly easy as it is not too hard of a stone.


Blow out the dust and expose the opening, ready for the next step. 


I made a loop of copper (which won't degrade in the moisture) and the long ends of the loop are pushed in the hole.


Next a small piece of lead was snipped from a fishing weight and placed at the hole with tweezers.


Then I used a nail set and a hammer to force the lead down into the hole, locking in the copper to the stone.


After setting and hammering the lead into place, the loop doesn't move any longer.


After making and setting the loops, I used copper wire to lace the root pad securely to the stone. After fully tied on, it doesn't move anymore. I then filled soil into the voids in the screen using a chopstick to poke the grains into place.


I then coated the rootball with muck made from sticky clay mixed with sphagnum moss. Green moss is a luxury here in Central Texas (especially in the summer), but is necessary to hold everything together as a top dressing. I had a stepping stone which always grows moss and I transplanted it to cover the roots of this tree. 


The branches were wired and worked, changing the shape to follow the curves of the stone. It is no longer a windblown image, but more open branched. Of course this may change again as it is developed. Now that the tree is firmly on the stone, I feel like I can now begin to develop its style and form.


Tuesday, June 9, 2020

We're having a heatwave, a tropical heatwave...

It is still Spring but tomorrow in Austin they are predicting we may reach 104F in the afternoon, which is root cooking temperature for potted plants in ceramic containers.  Pots in the sun will multiply the heat and reach killing temperatures to the roots if you are not careful. I thought it may be a good time to share my heat control measures.  I don't have an overhead shade cloth, and do not want to move trees each time the heat flares up, which is off and on all summer in Texas. The bonsai in the sunny spot of my yard need the intense solar radiation on their leaves to photosynthesize food, but can be damaged if the roots get too hot. My solution is to simply cover the ceramic pot with inexpensive Burlap cloth cut to fit which provides about 50% shade density. Think of it like your bonsai pots are protected by a straw hat.

Let's take this little Cedar Elm here


I'm not promoting a brand, but this is a 24 foot long roll I can buy at one of the big home improvement stores inexpensively.


Open it up and lay out the roll. Cut a strip which will not only cover the top, but which will also cover the sides, protecting the entire pot from heating up.


Take the square of Burlap and cut down the center, imagining where the trunk will fall when placed on the pot.  Then cut again sideways. This will allow little points of the cloth to gently wrap around the trunk.


I like to have the center-cut side to the back, so the front looks neater. Once it is placed, water your bonsai. The tiny fibers of the burlap will begin to stick to each other like weak velcro, holding the flaps together.


Here's another example. This pot has a very wide lip which catches a lot of sun and really heats up. In this case Burlap alone isn't enough to cool this pot. I start by cutting a piece of Burlap as before


Next I use coconut fiber to "pad" under the burlap along the edge of the pot.  I source this from the material used to line hanging baskets and I rip and pull it apart until I get thin sections of it, just thick enough to block the light, but thin enough to allow free flow of water.


The Burlap is then placed over the Coconut fiber both to hold it in place and to provide another layer of protection. 


Another type of bonsai which needs heat protection is a root over rock style tree.  In this case we need to not only shade the ceramic pot, but also the rock the tree is attached to.


I wrap the entire base of these trees with Burlap, like a little tent.


I will also go along and spray the burlap with water to moisten it and give the plant evaporative cooling during the heat of the day. While this heat fix may cover your beautiful pots, it's neutral colored, inexpensive, made from all natural products which can be composted after use, or even reused if they are in good enough shape the next year. I usually don't cover plastic pots or Mica, as these just don't capture as much heat as the ceramic vessels (place your hands on them in the middle of the day to test). Of course there are bonsai which have temperature tolerances which must be moved periodically, but for the sun-loving trees, especially my Texas natives, this has proven to be a great help to combat the summer heat. 


Tuesday, May 26, 2020

Schefflera grafting - let's shrink those proportions down

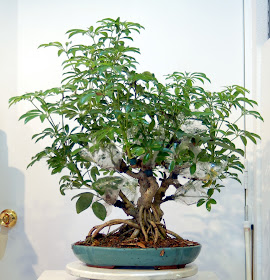
This Schefflera arboricola has become a favorite on the bench and also a long long history with me. It also is a great example of taking a leap to make a tree better. While not the most impressive of its species, it holds a special place in my heart. Here it is today:


Going back, this was a patio plant belonging to my grandmother in Houston. She moved from her home and I inherited it back in 1992. For her, it was a 6-foot tall, long limbed tropical she kept propped up against the wall of her greenhouse-back porch. I always remember it being there, so she must have had it since the 70's or maybe 60's. I regret that I can't find any of the early gangly photos, but if you've seen these in people's homes or offices, you get the picture. I also kept it as a tall tree for about 10 years and finally one day decided to give it a low chop and turn it into a bonsai (I was so tired of it always blowing over in the wind!).  A few years later it grew out to look like this:


I had worked on encouraging branching and proportion, but the problem was that each leaf was about the size of an open hand.. very coarse growth.  I would cut the long shoots short to encourage smaller internodes.


Which seemed to help, but with further growth, it just looked overwhelming large again.  I also defoliated it several times to try to encourage finer or even weaker growth.


It looked great for a short time, but after a small leaf or maybe two, it would resume the large leaf form.  As an added problem, I found that defoliating it meant that some of the shoots and branches would unpredictably die back each time. Not a great reaction for bonsai.


Something had to give, and luckily I met two new members of our local Austin Bonsai Society who moved here from Florida and had a dwarf variety of Schefflera called Hawaiian Elf. I took cuttings from their tree, and as you can see it has a much better and smaller habit than this big species variety.


Comparing the leaf size next to each other was startling! (And keep in mind this is Shefflera arboricola, not Schefflera actinophylla (the huge leaf Umbrella tree)


About this time I was getting into grafting, learning about adding branches and shoots and I decided to change out the foliage of this tree and see how it would do. End tips were selected from the Hawaiian Elf variety and they were grafted into the branches, the union wrapped with Parafilm. Then small plastic baggies were wrapped around the new graft to hold in moisture and it was all wrapped tightly with green plastic garden tape.


These were done in August, in the heat of summer to increase the likelihood of success.


After a few weeks I could see the new growth in the bag, so opened it just a little in the corners.  


By a month, the bags were completely opened and the ends were growing out of their confines.


I cut away the plastic, but kept the wrapper on because I didn't want these new branches breaking off.


Eventually all the wrapping came off and they were supporting themselves. They were actually outgrowing the original foliage, which was still left on as a safety.


Then all the original larger foliage was removed and the grafts were the only source of foliage.


These grew really well and surprisingly the original big leaves never have returned as a backbud. The tree seemed to like the additional foliar mass the smaller leaves provided.


This new smaller leaf variety also makes it possible to wire and change direction of the branches because the diameter is much smaller - an added bonus!


So that's the story of "Granny's Schefflera" which is somewhere in the age range of 40-50 years and has passed through at least two generations of my family.  It continues to grow strong and now has some added chapters to its book.